Stitching in a Mat
Using a grid (gridding)
Stitching with a single strand
Stitching in a Mat
Since 1995 I have been using a Mat when I stitch an ornament, or anything with a finished size of less than approx. 8" x 8". The first time was quite by chance. I wanted to stitch something that I thought might be too big for the flexi-hoop frame that I wanted to use. So I stitched the outline of the design on the fabric, cut a hole the shape of the flexi- hoop in a piece of box board and placed it over the fabric. It was a good fit so I taped the fabric to the box board and started stitching.
I used that mat to stitch about two dozen ornaments that year, and dozens more in subsequent years. I have found that I prefer mats over hoops or frames because:
1. The fabric stays flat so there are no creases to press when you are done.
2. It slips into a ziplock (then pocket) to make a more portable project.
3. I find it lighter and less tiring on the hands than a frame or hoop.
4. I find it easier to finish the thread ends when the fabric flat than when it is in a frame or hoop.
I have made many stitching mats since then. Here is a picture of a more recent one.
("Secret Visitor" by Ellen Maurer-Stroh as a WIP)
However I find that box board is not as thick and stiff as it used to be so I usually suggest that people buy a small mat from a dollar store, or cut one from mat board or illustration board. A single thickness is usually adequate.
I cut my mats a little bigger than the fabric and the openings a little bigger than the stitched area. I use masking tape to fasten the fabric to the mat board. (One can purchase acid free tape if they are worried about the adhesive. I haven't because on these small projects the tape is on the fabric for such a short period of time and because the taped area is usually cut away when I am finishing the ornament. In over 20 years, and hundreds of projects, I've never encountered a problem caused by masking tape residue.) If I plan to reuse a mat over and over I will put some packaging tape on the back side of the mat first. Then when I remove the masking tape it doesn't shred the card board.
In 2010 I discovered that I could also make an sufficiently rigid stitching mat using a greeting card. The key was taping the three open edges together. To maximize the rigidity of the mat I left the card full size and cut the opening as small as possible. I used a mat knife to cut through both layers at once so that the openings were identical.
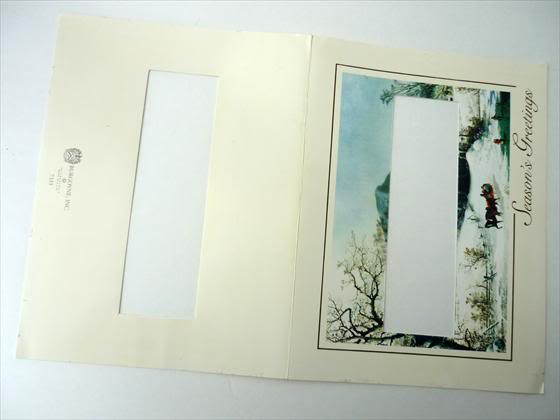
(In retrospect I should have covered the ink inside the card with some tape. No ink transferred to the fabric but next time I wouldn't take the chance.)

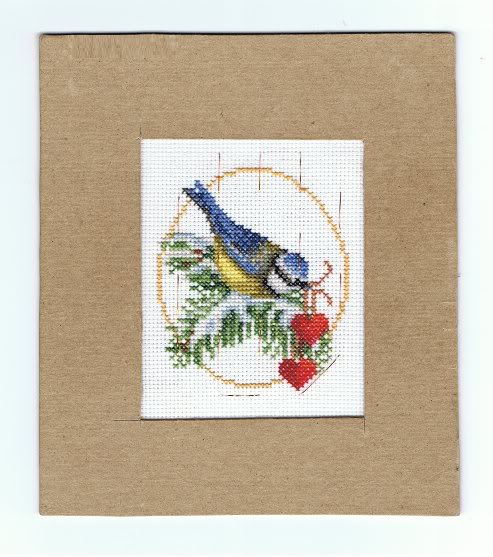
I had a choice between stitching with the front or back of the card facing up. This time I chose the front.

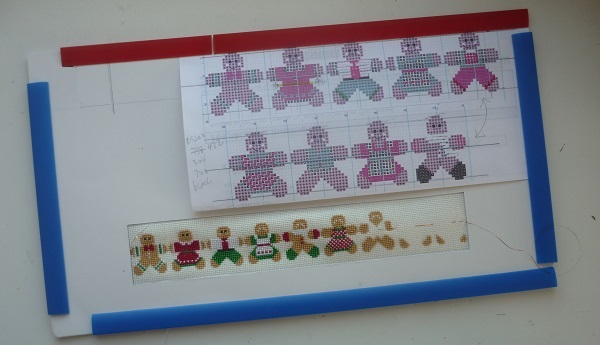
Forget me Nots Bookmark adapted from Victorian Cross Stitch Border.
http://www.cross-stitch.co/flowers/victorian-cross-stitch.html
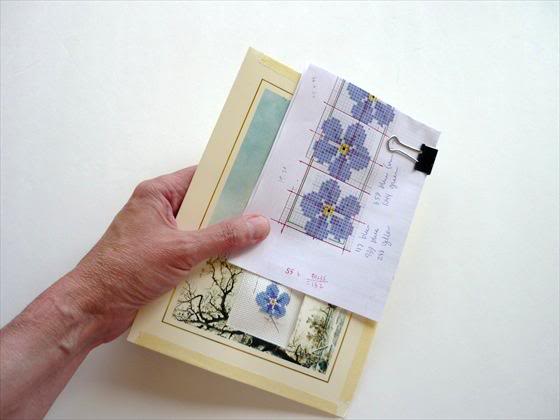
Sometimes when I am stitching an ornament I find that I can fasten the working copy of the chart to the mat. I usually use a small binder clip but paper clips (and maybe even bobby pins?) work just as well. It sometimes take a bit folding to get it to a manageable size...

...but I can move it around as I work my way around the design.
Subsequently I was using a greeting card for a project that I will stitch 19 or 20 times. I grew weary of removing and replacing the masking tape, on the outside of the card, and it occurred to me that I could use the sliding binding bars that are usually used on report covers.
This is what I mean by binding bars and they are available in office supply stores.
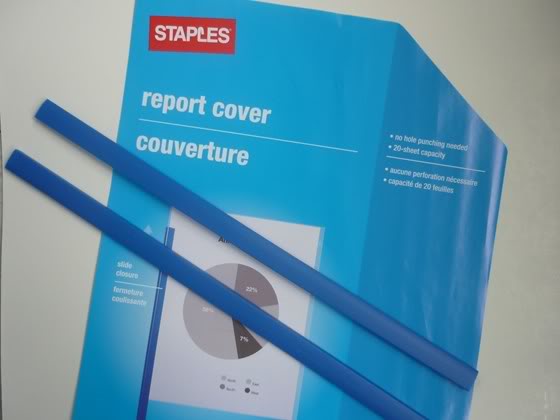
I cut two bars to make four shorter bars and slipped them over the four sides of the greeting card.

I didn't need a bar on the folded side but I used it anyway because it made all of the sides uniformly rigid. And it is also comes in handy to tuck in a chart or a plastic magnet.

2016 Postscript. I have recently been stitching ornaments that have a stitched area of approx. 1 inch by 8 inches. I didn't have any greeting cards long enough but I do have lots of 9" x 12" portfolio folders so I trimmed a bit off the open side of one of those and used it as my stitching mat.
Gridding
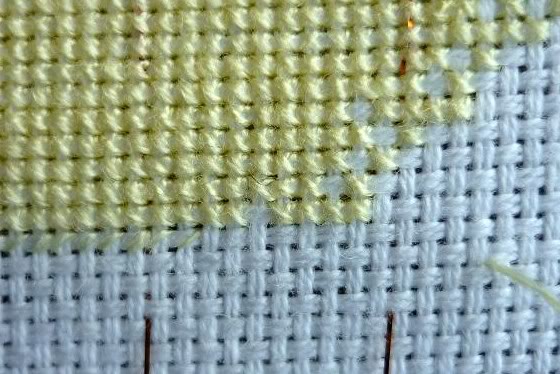
That first project where I used a mat was also the first project where I stitched some guide lines on the fabric before I did any cross stitching. On the next one I used sewing thread to stitch a 10 by 10 grid on the fabric. I noticed that having a grid certainly cut down on the errors, and I really don't enjoy fixing errors when I am stitching 22 Xs per inch with a single strand of floss.
Since then I have refined my gridding technique several times and I now have a few methods that are quick and easy to do.
For a complex project I grid the 10 by 10 lines to correspond to the chart. The way I do it doesn't take a long time; I can grid a 70 x 70 project in less than 10 minutes. I use a running stitch that goes over the equivalent of 10 stitches and under the equivalent of 10 stitches. Starting at the upper right hand corner I use my needle and thread to count the first vertical line very carefully and then I count over 10 for the next line. (I double check the first line before proceeding.) For the second and subsequent lines I don't need to count. I just run my needle along the thread and line up my running stitches with the first line.

This way I only need to count the first vertical line and then count over 10 between lines. As long as I prevent myself from counting all the other running stitches I can grid very quickly. (And when cross stitching I seldom make an error that results in me having to remove more than 5 stitches.)
For big project one doesn't have to grid the whole project before stitching. One can instead choose to grid and stitch just a portion of the project. One can grid a single page, or if that is too big an area that is maybe more like 50 stitches by 50 stitches, and stitch it. And to avoid excess counting one can choose to leave the gridding thread in place before they grid the adjacent areas.
For my Jim Shore Countryside project I gridded the first page (one block) and stitched it. Then, leaving the gridding threads in place for reference, I gridded the second block. When I finished the second block I removed the gridding thread from the first block and used it to grid the third block.
Sometimes on simple projects I just grid a box approximately as big as the design. Again I stitch over 10 and under 10 so that the running stitches correspond to the grid on the chart. When I am cross stitching the design I can run my needle lightly along the threads to find my spot. (For illustration purposes only I have marked the 10 by 10 intersections with a blue dot.) It is faster to grid a project this way but I notice that with this method my errors may exceed 5 stitches.

Sometimes I just grid the center lines and the outside edges. Since the running stitches correspond with the 10 by 10 grid of the chart I can run my needle along the threads (or use counting pins) to find the intersecting points. (For illustration purposes only these points are shown with a blue dot.)

(When the 10 by 10 grid of the chart is uncentered, the way this one is, I will usually use a red pen to draw new 10 by 10 grid lines on my working copy so that the center lines are on the new 10 by 10 grid.)
Thread for gridding When I first started gridding I found that the sewing thread would sometimes produce balls of fuzz when the embroidery floss passed adjacent to it. It was also hard to remove if it had been split by the cross stitching. If you grid with sewing thread I suggest that you remove it before you sew adjacent to it. Some people like fishing line for gridding, but I found that it was hard to see and the thicker stuff didn't bend easily at the corners. For me, the perfect gridding thread is Sulky Sliver Metallic thread. (Note that Sliver, not "Silver", thread comes in 24 colours.) It doesn't get fuzzy, it can't be split, it is easy to see and it bends easily around corners. I also find that if I leave it in until the project is complete it still slips out easily. In fact, I can sometimes reuse the thread to grid my next section or next small project.
There is at least one fishing line type product sold specially for gridding. It seems to have all of the advantages of the Sulky Sliver but the Sliver is less expensive. They also have a youtube video about gridding. On the video they grid the vertical and horizontal, which I find unnecessary, but I do like how they leave a little curve in the thread when they start a new row. This is probably dictated by the stiffness of the filament but it is something that someone can choose do with other threads. That way if the gridding thread get snagged it will just pull up the slack instead of distorting the weave of the fabric.Click here to see the youtube video.
I know that some people use "disappearing ink" pens to mark their projects but I've read enough stories about the marks from these pens reappearing in hot or cold conditions (eg. hot or cold car, moving van or attic) that I am also leery of these pens, especially for projects that can't be easily rewashed or re-pressed. For a sample of these stories read the following pages.
http://www.needlenthread.com/2011/01/erasable-transfer-pens.html
http://www.thequiltshow.com/bb3/viewtopic.php?f=4&t=4740&sid=683c9c584d53704ec6d4455405c554fd&start=0
http://janeweston.blogspot.ca/2011/09/frixion-pens-be-aware.html
www.quiltingboard.com/main-f1/washable-crayola-markers-t186730-2.html
http://ths.gardenweb.com/forums/load/quilt/msg0222241612023.html
If someone is keen to try them then I suggest that they do some experiments on a scrap of the same fabric. Mark it, subject it to humid conditions and hot conditions, wash it, dry it and then subject it to hot or cold conditions. Personally I've always found that the easiest way to count cross stitch fabric is with a needle and thread (if I lose count the 10s are already marked) so for me it has always made sense to also mark it with needle and thread.
There are people who have never gridded that cannot see the sense of it. To each their own, but my own is mostly stitching 22, 25 or 28 stitches per inch with a single strand of floss. Over the years I have decided that I would much rather spend 10 minutes making nice long running stitches in a new piece of fabric than even 3 minutes trying to neatly remove tiny stitches.
Stitching with a single strand
When one wants to make finely detailed cross stitch ornaments they often end up stitching single strand over one on 22, 25 or 28 count fabric. One of the challenges of stitching with a single strand is that you don't have the luxury of using the loop method to start a thread. When I started stitching single strand on 22 count hardanger, in 1995, I soon found another way that works for me. Many years later I found out that this is known as a knotless waste knot. More recently, when I starting stitching single strand on 25 and 28 count, I realized that I could also finish threads in a similar manner.
After I finish the last stitch of a thread I bring the needle and thread up again two rows DOWN and about 1/2" to 3/4" away in the direction I am working.
To start my next thread I insert the needle two rows ABOVE and 1/2" to 3/4" away in the direction I am stitching. I bring it up where I want to start and pull the thread through until there is about a 1/2" of the tail on the top.

I make my first stitch and carefully pull until I notice the tail starting to move.

Then I continue stitching so that the thread ends are caught in the back of the next stitches. To make sure that I don't miss the thread I want to catch I sort of drag the needle up the back of fabric until I reach the hole I am seeking. After about 4 or 5 stitches I can flip the fabric over and cut the threads. (Though this time, because they are out of the way at the end of a row, I would probably just leave them for later.) Now I'm going to break my *rule* and show the back of my stitching.

Note that starting and stopping this way catches two threads and although one might think that this would leave a big bump I have not found this to be the case. If someone wanted to avoid catching two threads at once they could leave their starting thread to the left, where it would get caught on the return trip, or it they were already on a return trip when they were starting the thread, it could be left where it would get caught by the next row of stitching.
Of course this method doesn't suit every application so here are some other tips.
Previously, when I stitched single strand on 22 count, I would most often finish a thread by tunneling under every second stitch. That way I wasn't trying to pull on the same stitch from both sides and there was a bit more give. Finishing threads vertically provides even more give since you are only pulling on one stitch in each row.
To finish off threads under even smaller stitches there are other things that one can try. If one stitches both legs of each stitch, the / and the \, before stitching the next stitch then there will be a slightly longer diagonal stitches on the back that one can tunnel under when it comes time to finish a thread. Also, when one has the opportunity to finish a thread at the left edge of a block of stitching there will be vertical threads, between the end of one row and the beginning of the next, that span two rows. These are easier to tunnel under.

Pinwheel 2009, 2010 and 2016

After decades of doing counted cross stitch and reading umpteen books and magazines, I thought I'd learned all there is to know, then I started reading your blog. Thanks for the many ingenious tips and "ponderings"!. I've been using all sorts of hoops, q-snaps too, but your mat idea is pure genius. - susanholly
ReplyDeleteThanks for letting me know that one of my "ponderings" will be useful to you. I know that not all of my ideas are suitable for every stitcher but it is nice to read feedback that tells me that a stitcher has happened upon something here that will make their stitching easier or more enjoyable.
DeleteI came across this page, and it shows the Forget-Me-Not cross stitch. I have been looking for one for a while. I clicked to the link but it is no longer good. Would you be able to tell me where I can find that pattern? Thank you for your help. Mary Winegar
ReplyDeletequilter.maw@sbcglobal.net
I'm sorry Mary. That website is gone and it doesn't look like it is available anywhere else.
DeleteThank you sooooooooo much for your website. I haven't done cross stitch for 15 years. I am now ready to return. I used the grid with a pen and now I will use the thread. I thought that the thread had to go into each square. Wow! What a wonderful way of doing it. Your pictures are fantastic!!! Again, thank you!
ReplyDeleteYou are very welcome. There are many ways to grid and after trying a few I found that these are the best methods for me. You may find that other methods work better for you.
DeleteI need 8x10 folk art mat any idea of making one? or where I could get one? doing projects from cross country mag and they no longer sell them .wbonsi@aol.com
ReplyDeletethank you.
I'm sorry I can't help you with that request however I will suggest that you could try asking your question at 123 Stitch Message Board.
ReplyDeletehttp://www.123stitch.com/cgi-bin/BBS/bbs_forum.cgi
There are so many people there who know so much that I don't know!
I am looking for paper pieced santa pattern. Can you help me? Bea.galloray@yahoo.com
ReplyDeletewonderful posts
ReplyDeleteFantastic!
ReplyDeleteGood JOB
ReplyDeleteAppreciated!
ReplyDeleteInteresting work!
ReplyDeletenicee
ReplyDelete