Tassels, Tails, Twisted Cord ... and Bows
I often see the question "When I use Twisted Cord how do I tuck the ends into the ornament?" Usually my solution is to make the cording a little bit longer and turn the ends into a tassel or tail.
When one makes their own cording they can simply bind the ends together at the bottom of the ornament and then set them free to become a tassel. That is what I did with this three sided ornament.

Details of how I do this can be found on this blog page.
Twisted cord and tassel tutorial
For more information on making cording see the following tutorials
Making one or two colour cording by hand
http://dmc-threads.com/cording/
Making one or two colour cording with a drill
http://www.instructables.com/id/Make-Custom-Cording/
Making cording using your sewing machine's bobbin winder
https://www.youtube.com/watch?v=Aj_GdyCXZ4A
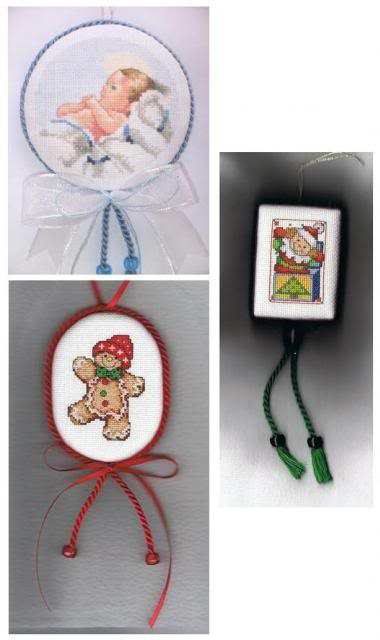
When I use commercial cording I leave the cording ends a few inches longer and bring them together with a bead or bow at the bottom of the ornament. Here are a few of examples.

("Christmas Design 2004" from Told in a Garden, "Sweet Greetings Gingerbread" by Mill Hill, Jack in a Box from a Bernat kit.)
To see how I turn the ends of commercial cording into a tassel click on the picture below.

A description of how I add a bead to commercial cording is a bit further down the same page.

Sometimes I cover the two ends of the cording with a single tassel.

(From "Sam Hawkins' 520 Christmas Cross-stitch Designs")
Or I can make a tassel to cover each end. (If you click on the picture the instructions for this kind of tassel are halfway down the page.)

One could cover the ends with a piece of ribbon that is tucked into the ornament. I haven't done this over cording but I did do it over piping on this Lavender and Lace ornament. (You'd have to remember to not glue that section when you are first sandwiching the ornament together.)

("Christmas Madonna" by Told in a Garden.)
One could then make the join on the top or bottom. Or even on the diagonal with a second piece or ribbon to balance it off.

Tassels
There are also tutorials online that show how to make seperate tassels.
If you want the fullness to approximate the thickness of a skein of embroidery floss than one can make DMC's No Hassle Tassels.

Using this method one could make one long or two short tassels from a single skein of floss.
Though I suggest threading the wrapping thread into the top of the wrap and cutting them the same length as the other tassel threads, like in this Sew 4 home tutorial illustration. (Click on the image to see the whole tutorial.)

The only thing that I would add to the above tutorials is that I have found that I get neater tassels if I cut the ends with a rotary cutter and a ruler.
Or one could make a looped tassel. Click on the photo below to learn how to make a looped tassel.

Here is the fanciest tassel that I have made so far. There are two twisted and beaded cords on either side of the tassel. (I would be embarrassed to admit how long it took me to figure out that the cording I used for the beaded part could could just be set free on the other side of the tassel.)

Bows

(From "Sam Hawkins' 520 Christmas Cross Stitch Designs".)
There are online tutorials for just about every kind of bow imaginable. There are lots of links on the following page,
http://www.save-on-crafts.com/howtomakebows.html
http://www.offray.com/howto.html
but they don't seem to have the faux bow I frequently use.

 >
>

Now I can knot the pink ribbon and tuck it neatly away at the back or make a wee pink bow on top of the white bow.
And this pinwheel bow, from http://www.instructables.com/id/Pinwheel-Hairbow/
looks good on the top of ball ornaments or no sew cubes.

And lastly here is a tutorial that shows how to use a fork to make tiny bows.
http://craftroom.info/how-to-make-a-small-bow-using-a-fork/#more-1397

Pinwheel 2009 and 2012

Love it
ReplyDeleteEnjoyed and learned reading your ideas on braiding. Need some advice.
ReplyDeleteI've cross-stitched a christmas stocking and now need to finish the perimeter with braiding. Will definitely use your instructions to complete this task. Looking for your thoughts/advice on attaching the braid to the stocking. Noticed you glued to the ornament, but I'd rather not do so to the stocking.
Thanks and look forward to your response.
Hi Monica. I couldn't find any specific information about stitching cording onto a stocking but I agree that for that purpose stitching would be better than glue. I did find a tutorial where someone stitched their ornament together at the same time as adding cording. Perhaps that might work for you.
Deletehttp://stacybinnj.wordpress.com/basic-no-glue-ornament-finishing-tutorial/