
These eggs are real, but empty, eggs covered in Japanese Washi / Chiyogami paper. I tried wrapping paper for my first few eggs and found that the paper didn't want to lay flat on the curved surface of the egg. Then someone sent me some Washi paper. The ones I made with this paper were easier to do because the Washi paper molds to the curves of the egg. If you don't have a local source for Washi paper consider The Paper Place Online. They have more than 700 different Chiyogami papers and they don't charge to ship sample sized papers (8.5" x 11") to North American addresses.
There are some very good tutorials online. They are basically similar, but you may learn something different from each one.
http://www.decoupage-online.com/Washi%20Eggs.pdf
https://au.lifestyle.yahoo.com/better-homes-gardens/craft/h/16406896/how-to-make-washi-eggs-july-19/
http://www.yasutomo.com/project/washieggs.htm
http://chihuahua-yip.deviantart.com/art/How-to-make-washi-eggs-102939796
Here are some of my eggs.


More photos can be seen at http://www.flickr.com/photos/14426014@N05/sets/72157602642721343/
Additional hints:
1. Paper and Eggs. I have found that Canadian medium sized eggs are the perfect size for the 6 inch (15cm) squares of Washi paper because I can cover two eggs from each sheet. Or letter sized (8.5" x 11") paper can be cut into four rectangles (approx. 3 1/8" x 5 1/2") that will also cover this sized egg. (But don't assume that my experience will apply to your eggs!) I have found that paper with gold ink is especially attractive if you apply many coats of finish to the egg because the gold ink almost appears to float above the paper.
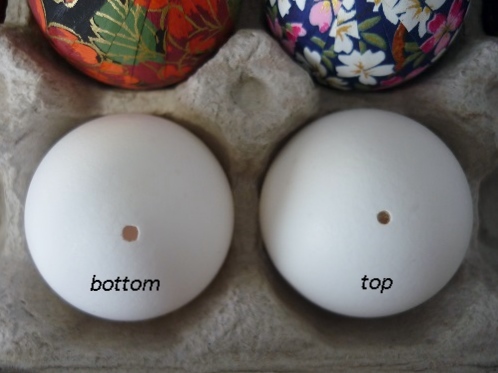
2. Holes. I have used two methods to make small tidy holes to empty the egg.
A) My preferred method is to use my 100mm needle files. I first poke a hole with a strong sharp darning needle (or seam ripper) and then carefully use my smallest (round) needle file to drill a larger hole. The resulting holes aren't quite large enough to accommodate a toothpick so I carefully drill the top hole with my square file and the bottom hole with my slightly larger triangular file.
B) Before I had the needle files I used my strong sharp darning needle to pierced a circular pattern of tiny holes and join them together. See the third picture on this page.
When the two holes are complete I insert a toothpick and "stir" in a wide circular motion to break the yolk and sever the chalazae (the opaque ropes of egg white that hold the yolk in the center of the egg) at either end. This makes it much easier to blow out the contents. (If one is planning to make many eggs they could consider the inexpensive egg blowing tools sold through pysanky egg web sites.)
3. Marking and cutting the strips. If you choose to mark lines on the back of your paper do it very lightly and gently. Dark lines may show through, especially on light coloured paper. I drew my lines 1/4" apart and I also made my center band (the part that goes around the equator of the egg) 1/4" wide. (The 1/2" wide band recommended on most sites may work well on large eggs but it was too wide for my chicken eggs.) To quickly mark the lines you can use a quilter's ruler or you can lay your paper on the top of a bigger piece of graph paper and use the graph paper lines as a guide.

The first tutorial I found for making washi eggs advised trimming one side of each strip. Since it worked for me, and involved less cutting, I continue to do it this way.

4. If I intend to make a hanger for the egg I don't cover the hole at top (the fat end) of the egg. To make this easier I insert a round toothpick in that end and trim the strips to just touch it. Though I don't need a hole on the bottom of the egg I also don't want an excess of overlapping paper. So once again I insert a toothpick and trim the strips. Until I get to the last strip. When I get to the last strip I remove the toothpick and let the end of the strip cover the hole.

5. If you decide that you want to paint (or dip) a finish on your Washi covered egg it is nice to have something to hold onto. I use a toothpick. I insert about 2 cm. (3/4 inch) of the toothpick into the egg and apply a ring of white glue around it. When it is dry I have a sturdy handle.

Between coats some people stick the handles into a block of styrofoam. Since I dip my eggs I prefer to hang them up so the glue around the handle doesn't softens up again. I use a cardboard shoe box with three or four holes in the top to accommodate three or four eggs. A clothespin holds each toothpick while the eggs dry. (One could also use something like an alligator clip, or binder clip or...)

6. The links above recommend lots of products to finish Washi Eggs, and I'm sure that they all work well. However, I'm never happy with the results when I apply finish with a paintbrush. For that reason I use a brush mark free method that I know works for me; I dip my eggs many times in a dilute solution of decoupage medium.
In a small bowl I add one part matte decoupage medium to one part water and stir very gently to prevent bubbles. Because it is hard to get the solution right up to the top of the egg I use a wide brush to generously apply the solution to the shoulders of the egg. Then I tip the bowl and twirl the egg around and around in the solution.

After several rotations I gradually bring the toothpick to a vertical position, while still twirling the egg. Then I hang it to drip. After about 5 minutes I lightly touch a wet paintbrush to the bottom of the egg to wick away any excess solution. When it is dry I repeat the process. (To keep the solution in the bowl from evaporating between coats I slowly add a small amount of water to the surface and cover the bowl with cling wrap. When I am ready for the next coat I gently stir in a small amount of decoupage medium.) After about 8 or 9 coats the seams of the paper are not apparent on the surface and I'm ready to apply the final coat of solution. I like to use the gloss decoupage medium for the final coat but I first use 400 grit sandpaper to remove any bubble bumps and give the whole egg a light buff.
P.S. In 2014 I got braver and used a faster process. I used a wet brush to apply 3 coats of full strength decoupage medium and then used my dip method to apply 2 coats of dilute decoupage medium . The result was the same but there was a lot less waiting.
To prevent a decoupage finish from getting sticky in damp or humid conditions seal the finish as recommended by the manufacturer's recommendations.
7. To add a hanger to the egg I first cut the ring of glue to remove the toothpick. (Using a mat knife, or box cutter, I cut perpendicular to the toothpick close to the top of the egg.)

Then I tie a string (in this case dmc perle #12) to the middle of a very short bent pin. (Alternatively one can use a bead that just fits through the hole.)

Then I push the pin, sharp end first, through the hole

and use a toothpick to push on the knot until all of the pin is in the egg.


(If I had used a bead I would now seal the hole with a drop of white glue.)
Then I can thread the sting through some beads,

or a bead cap and bead, and tie a knot to hold them in place. A drop of glue on the knot makes it extra secure.


Pinwheel 2009 and 2014

The eggs are beautiful! They look so delicate, and time consuming, but I bet it's all worth it. They look beautiful in the vases.
ReplyDeleteAmanda
Thanks for your kind words Amanada. They are fairly solid when they are finished, but I am careful not to drop them on hard surfaces.
ReplyDeleteBeautiful work - these are gorgeous! BTW, I think only 2 of your links above work, the rest are "page not found"...
ReplyDeleteThanks for letting me know. I couldn't get the first two to work but I'll keep looking for them. The last one worked for me but I had to click on the strip of little pictures to enlarge them.
DeleteI found the new web address for the first but not the second so I removed it.
DeleteOh my goodness, those are absolutely stunning! I'm pinning this for next year. And thanks again for stopping by my blog. I'm looking forward to checking out more of yours. Have a great weekend!
ReplyDeleteDebbie
Thanks Debbie.
DeleteGreat blog you have
ReplyDelete