
Click here to view, print or download a pdf of this tutorial.
Materials Used :
* Two stitched pieces of fabric
(I used designs from Dimensions "Friends Gather Banner" kit.)
* One block of wood - 3/4" thick
* Scraps of mat board
(I used pieces cut from a Dollar store photo mat. I think that it is a little thinner, and easier to cut, than the mat board used by a professional framer.)
* Approx. 16 inches of 1/4 inch wide Ribbon.
(I used the stiff ribbon that one might use for a corsage because it is more resistant to fraying. If none had been available I would have used regular ribbon and treated the one exposed end with Fray Check.)
* Approx. 7 inches of strong but not too thick thread for hanger
(I used DMC Pearl #12.)
Assembly
These are the dimensions for the house shaped block that gave shape to my birdhouse. I cut mine from a 3/4 inch thick block of wood but one could use three pieces of 1/4 inch thick foam core or a 3/4 inch thick piece of styrofoam. (One could make a thicker or thinner birdhouse but you would have to add or subtract the difference to the width of the mat board pieces.)

To mark my wood block I stuck a big sharp needle through the pattern at the corners. Then I removed the pattern, drew lines between the points and cut the wood along the lines.

These are the dimensions I used for the mat boards. I cut a 1-1/4 inch wide strip of blue mat board and then cut the strip into three piece each 2-1/4 inch long. These pieces were for the roofs and base. Then I cut a 3/4 inch strip from off-white mat board. This strip was for the side walls.

I have been told that one should not leave stitched fabric in contact with unfinished wood. The wood should be covered with paint, sealer, fabric or acid free paper. I used paper, but it is just a personal preference. To quickly cover the block with paper I glued the house to a square of paper and let it dry paper side down. (I used decoupage medium but an acid free glue stick would work just as well.) I didn't need uniform coverage, but I made sure I had good coverage at the edges. When the glue was dry I cut around the block. To make it easier to see the edge and get nice and close I held the block paper side down. Then I repeated the process to cover the other side.


To cover the edges of the block I used a strip of paper 3/4 inches wide and some more decoupage medium.

Next I marked my fabric pieces. I cut out the pattern and placed the hole over the stitched piece. I moved it around until I had it centered the way I wanted it. (Remembering that the 1/4 inch ribbon would be covering the top and bottom edges.) I used a running stitch to mark the center line of the gable and pins to mark the line for the bottom, but one could use all pins, or even pieces of tape. When I lifted the pattern I cut the fabric along the line for the bottom, following the threads of the fabric.

Then I applied glue to the top and bottom edges on one side of the wood block. I was careful to apply the glue within 1/4 inch of the edge and to not use an excessive amount that would seep into the fabric. I used Elmer's Craft Bond Fabric & Paper Glue, but an acid free glue stick would work well too.

Next I positioned the fabric over the block so that the bottom of the fabric met the bottom of the block and the center line of the fabric passed over the peak of the roof gable. Then I pressed the edges of the fabric against the block at the bottom and roof edges. (I advise using something like a scrap of mat board to do this in case some glue does seep through. It keeps your hands clean for future steps.)

Next I removed the basting thread and left the glue to dry. When the glue was dry I repeated these steps for the back of the ornament and left it to dry.

Then I was ready to cut the fabric at the roof edges. I gently folded the fabric from the top side back a little and cut the bottom fabric adjacent to the block.

I continued cutting the roof edges until it looked like this:

Next I trimmed the fabric at the sides of the block. It is best if the fabric from the front and the back just meet in the middle so I trimmed it about 3/8 inch from the side edges of the block, as indicated with the pink lines on the following photograph. I then folded the fabric from the front and the back against the sides to makes sure that there was no overlap. If necessary I trimmed it a little more.

To attach the fabric at the sides I applied two thin lines of FabriTac Glue to the block. (Double sided tape would also work well for this step.) I pressed the fabric from one side flap into it. (Note that I used a scrap of mat board to hold it in place until the fabric was confidently stuck to the block. With FabriTac glue this happens very quickly.)

Then I pressed the other side flap of fabric for that side wall into the other line of glue. If I was using a glue that didn't dry quickly I would position both flaps for one side wall and then lay that side down on my work surface until it dried. (If you are using foam core or styrofoam you could use small rust proof pins for this step instead.) If there had been any fabric extending above or below the side walls I would have trimmed it off before proceeding.
To keep the roof nice and flat, and to decrease the possibility of the hanger pulling out, I made a small dent in one side of the block near the peak of the roof. (I used the points of an old pair of scissors.) Then I knotted the ends of the hanger string together.

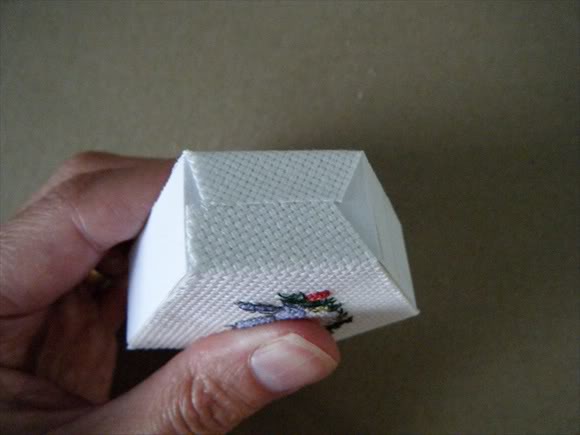
I wanted the finished roof to meet in the center like this...

...so I was very careful about the placement of the roof pieces.
I applied FabriTac glue to the block on the "dented" side of the roof. I made sure to get some in the dent, above the dent and on the roof edge on either side of it. Then I laid the hanger in place with the knot in the dent and the loop going over the peak of the roof.

Next I gently positioned one of the pieces of blue mat board on the glue. First I checked that the overhang was about equal on the front and back and then I laid it on my work surface as shown in the photograph below. I made sure that both the block and the edge of the mat board were flat against the work surface. Then I checked to see if the overhangs were still about equal and parallel to the front and back surfaces of the block before pressing the roof piece against the block. I removed any visible glue with a clean toothpick.

I left it in this position for a few minutes then flipped the block over so that the mat board was against the work surface. I left it to dry.

Then I was ready to attach the other roof piece. I applied FabricTac glue to the block and, with the hanger sticking out and the two mat boards lined up at the front and back,

I gently positioned the second piece of blue mat board on the block so that the underside of the second piece just covered the exposed top edge of the first piece. I laid the birdhouse on the work surface so that the first roof piece was flat on the surface and checked that the top edge of the second roof piece just touched the work surface.

Then I checked that the overhangs were parallel to the front and back of the block and pressed the roof piece against the block. After I removed any visible glue with a clean toothpick I left it for a few minutes. Then I flipped it over so that the second roof piece was against the work surface.

When it was dry I was ready to add the ribbon trim. I needed to cut six pieces of ribbon each approximately 2 -1/4 inches long so I used the one remaining piece of blue mat board as a guide. I was careful to cut the ribbons straight across so that they would be a good fit at the top of the roof.
Next I glued one of the ribbons under one of the roof slopes. Because I didn't want the glue to saturate the ribbon I used a toothpick to apply a very small amount of Elmer's Fabric glue to the fabric. (One could also use an acid free glue stick on the ribbon.) Since the purpose of the ribbon is to cover the gap between the fabric and the roof overhang I laid the ribbon gently in place, eased it towards the center and then towards the roof until no gap showed in either direction. When it was in place I used a scrap of mat board to press the ribbon into the glue. I removed any visible glue with a clean toothpick.

Before I glued on the second piece of ribbon I laid it in place and checked that the cut edge was cut at the same angle as the roof slope at the center. If if hadn't been I would have trimmed it. Then I followed the same steps that I used for the first ribbon.

I left them to dry and then added the ribbons to the other side of the ornament.
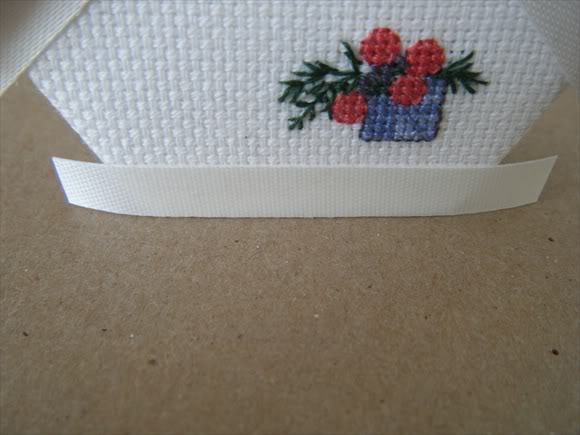
Then I was ready to add the ribbons to the bottom of the birdhouse. I applied a small amount of Elmers Fabric glue along the bottom edge of the fabric and gently placed the ribbon over the glue. (One could also use a acid free glue stick for this step.) I stood the block up on the work surface and eased the ribbon down to just touch the work surface. Only then did I use a scrap of mat board to press the ribbon into the glue.

I removed any visible glue, left it to dry and then repeated the procedure for the other side.
Then I was ready to glue the ribbons to one of the side walls. I placed a drop of FabriTac glue on the back of each ribbon end.

I held a scrap of mat board against the front of the block to hold the ribbon flat and then used another piece to press the two ribbon ends against the side wall. When I knew that they were secure I repeated the procedure for the ribbons from the back of the birdhouse.

Then I was ready to attach the mat board to the side walls. To prevent a gap between the bottom of the birdhouse and the base it is important to get the length of the mat board just right. I did this one of two ways.
Option #1. For this method I cut the mat board to the correct length before gluing it to the mat board.
I positioned the strip of off-white mat board under a roof slope and centered it on the block. I marked the mat board with a pencil.

I removed the mat board and cut just inside the line. I double checked the length to make sure that it wasn't longer than the side wall. (Ideally, because of the angle, it will be a touch shorter against the side wall but just right at the outside edge.)
Because it is not possible to use the weight of the block to press the mat board against the block while the glue dried I usually used the fast drying FabriTac glue for this step. (I use double sided tape for the very last one I made and I was impressed with the results.) I put the glue on the back of the mat board, positioned it in place, pressed it against the side wall and held it until it was secure. I removed any visible glue with a clean toothpick and repeated the procedure for the other side.
Option #2. My preferred way to cut the mat board for the side walls was to glue it in place and then cut it to length.
To do this I cut the strip of off-white mat board in half. I applied the glue (or double sided tape) to the back of the mat board and positioned it under the roof slope. I checked that it was centered, pressed it against the block and removed any visible glue.

I repeated the steps to attach the mat board to the other side.

When the glue was dry I could cut the side wall to the proper length and angle. The trick to this is to make sure the blade of the scissors stays flat against the bottom of the block as the scissors are squeezed close. They tend to want to lift a bit towards the end of the cut, like they did in this picture...

...so I used my thumb to push them back against the block and finished the cut.

I cut the other side wall to length then stood the birdhouse up on the work surface to check that the length of the side walls did not create a gap under the birdhouse.
Finally I was ready to glue the birdhouse to the last piece of blue mat board. I applied Fabric Tac to the bottom of the block and gently positioned it on the mat board. I checked that it was well centered and that the front edge was parallel to the edge of the mat board.

Then I pressed the birdhouse against the mat board, checked that there was no visible glue and left it to dry.

Click here to view, print or download a pdf of this tutorial.
Note. After I completed this tutorial I made this similar birdhouse. Click on the photo to read about its construction.


Pinwheel 2009

This is beautiful!! That is so sweet of you to take the time to post the tutorial for this lovely birthhouse.
ReplyDeleteThank you so much.
You are very welcome Yvonne. The tutorial is a Work in Progress that I hadn't meant to publish just yet. I'll leave it be and try to get back to edit it soon.
ReplyDeleteThis is adorable. One day I may just get the guts to do one like this. Or maybe that's being too optomistic!
ReplyDeleteI'm rooting for you Kim! In fact, to make it easier I'm going to put together a pdf version of this tutorial that you can print or save to your computer. When it is done I'll add the link near the top of this page.
ReplyDeletemuy original!!!!!!
ReplyDeleteMuchas gracias!
ReplyDeletesuperbe ;merci ,merci pour votre générosité.
ReplyDeletedany15
Merci pour votre gentillesse
DeleteThank you for showing us this beautiful birdhouse!
ReplyDelete