
("And Even a Mouse" by Lori Birmingham, stitched on 22 count hardanger.)
This page is the second blog page about flat ornamenets. To view the first page click here.
To make a banner using my flat ornament method I use a piece of fabric twice as long as my finished banner. I stitch the front of the ornament on one end and the back of the ornament, if any, on the other end. After I fold the fabric in half I can use a running stitch, or a double running stitch, to make a box around the design. The area between the top line of stitching and the fold of fabric leaves a slot for a dowel or cord.
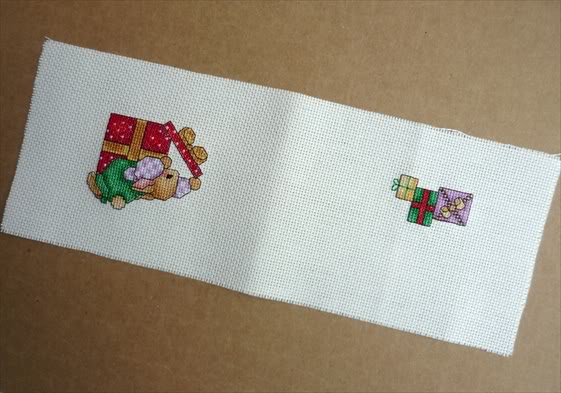
For this banner I decided to stitch a running stitch 5 "threads" from the top, bottom and sides of the design on the front. I began in the bottom corner and stitched over two and under two. I flipped the fabric for each stitch to make sure that the needle was centered in the correct hole.

When I had stitched all four sides it looked like this...

...and this.
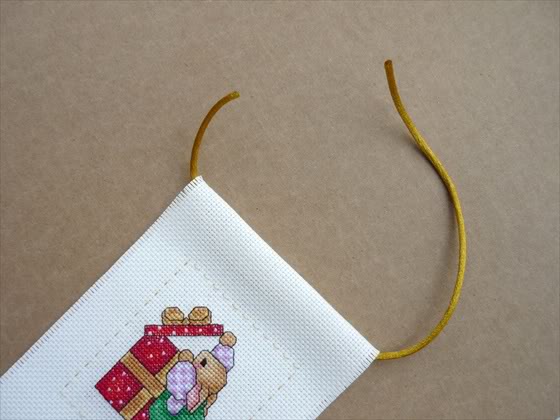
I removed two "threads" from each edge. (For 22 count hardanger actually means 4 threads.)

Slipped a piece of satin rat tail cord in the slot...
... and slip stitched the ends together.

Then I rotated the ends into the slot.


Banner Ornament Variation #1
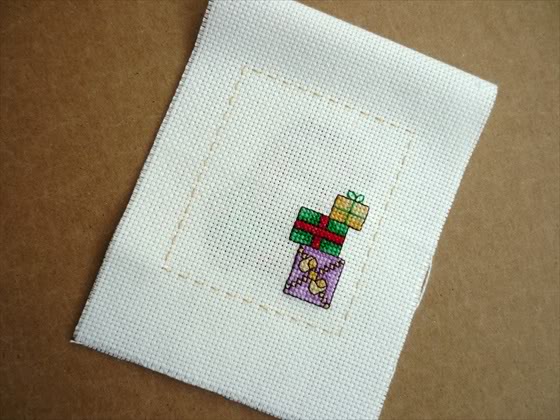
For this ornament I already had rectangles as part of the design so I decided that I just wanted to add a line of stitching on the bottom and sides. To keep the continuity of the line I stitched lines of double running stitch along where the slot would be.

(Michael Powell Christmas Tree, download available to members at http://www.michaelpowellart.co.uk Stitched on 22 count hardanger.)
Then I folded the fabric and began to sew the running stitch down one side...

...along the bottom and up the other side. When I reached the stitching at the top I reversed direction and filled in the running stitching (double running stitch) ...

... down the side, along the bottom and back to the beginning. I frayed two "threads" from the bottom and sides. I threaded a piece of stain rat tail into through the slot, slip stitched the ends together...

...and rotated it so the ends were inside the slot.


Banner Ornament Variation #2 (Bunny Banner Redux)
I wasn't completely satisfied with the running stitches on the Bunny Banner because they looked a bit anemic. I knew that I didn't want to punch it up with a double running stitch nor did I want to use a darker floss. I considered using two lines of running stitches and then I came up with a better plan.

I decided to use the same colour of thread but I used DMC Perle #12 and a satin stitch instead. (Two strands of floss would have worked too.) I left the running stitches in place as basting, though normally if I am going use basting stitches I don't place them where they will be covered up. I coped this time by removing them every inch or so.
I began by slipping the needle from the front of the fabric between the two layers to the starting point. This long stitch of thread was positioned so that it would be covered by the first stitches. I always like to start with my first stitch on the front and beginning on the inside of the project. (This is more important when I am making a bound ornament because I will be cutting the fabric right against the satin stitch.)

I began to make satin stitches, passing the needle through both layers of fabric and making sure that it passed through the center of the hole on both. After I had made a few stitches ...

...I tugged the thread end a little bit and cut it close to the fabric so that it disappeared under the fabric.

I continued stitching until I reached the end of the thread. I like to make the last stitch on the back of the fabric. I slipped the needle in the hole but I only passed through the top layer of fabric. I tunneled back in the direction I had just stitched and emerged between the stitches, about 1/2 to 3/4 inches away.

I gave a gentle tug on the thread, cut it close to the stitches and watched it pop under the stitches. I began the next thread the same way that I did the first, on the top side and towards the inside of the project.

I continued on this manner, removing the basting stitches about every inch or so, until I was finished.

Note: When using a satin stitch the back will appear slightly different than the front because the stitches are on a slight slant.

I think this is less noticeable when the corners are all stitched, but I chose not to do that for this project. This is what it could have looked like if I had chosen to stitch the corners.
Front

Back

If I had been going to make a bound ornament I would have stitched the corners so that I could cut the fabric right to the stitching.
Click here to continue to the page about bound ornaments.
Another note: If I had wanted the satin stitches to look exactly the same on the front and back of the ornament I could have stitched satin stitch "frames" on both the front and back of the ornament, before I folded it half. Then I could have used a thread that matched the fabric and running stitched around the box. If I had used a satin stitch on both sides and then sewed the two pieces together with a running stitch, it would look like this...


And if I had continue around a second time to make a double running stitch it would have looked like this...


Using this method one could choose to use another specialty stitch, such as four sided stitch, double herringbone stitch, long arm cross stitch or Montenegrin stitch to "frame" the ornament and then sew the front and back together with a thread that matches the fabric.

Pinwheel 2010

All of 'flat ornament' tutorials are fabulous. You provide so much more detail that most. Love the blanket stitch borders that look like satin stitch (although I'm scared to cut that close!) and the idea of using fun foam as padding. You are one clever lady.
ReplyDeleteThank you for your kind words Annie. In the past I've left out details to try to keep the tutorials short but lately I've been thinking that it is probably better to bore the experienced crafter than to puzzle the less experienced crafter.
ReplyDeleteAs for cutting that close, I suggest that you try stitching and cutting a scrap of fabric first. I did cut some of the blanket stitch when I cut my first Emie Bishop heart, and I quickly figured out how to remove a couple of stitches on either side of the cut so I could restitch it. But after a while I learned to use the side of the scissor blade to push away the blanket stitch before closing the scissors.