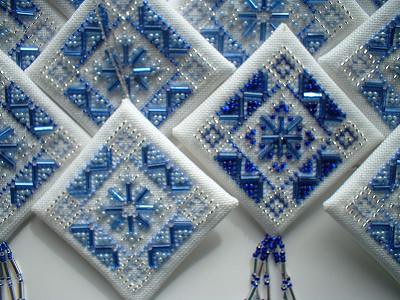
Ice Blue Snowflake - Mill Hill Item: MHTD17
What follows is an explanation of how I finish diamond shaped ornaments, but first I want to mention that this is an ornament that I never intended to finish. I stitched it just to try out some different beads. After that, at various times, I have used the unstitched corners and edges to experiment with different threads and to try different edge finishes. As such there are some "blemishes" from stubborn fibers of removed threads and one edge that is cut very close to the stitching. But warts and all when it came time to make this tutorial this diamond was what I had readily available.
The first thing I do when I make any diamond ornament is to check to see if the weave of the fabric is square. To do this I baste a line of stitching 10 threads out from the finished stitching

This one appears to be square but I used a strip of paper to check it. I marked the distance between the lines of basting on the top and the bottom on the paper. Then I did the same thing side to side. It was slightly wider side to side.

From past experience I know that this will not make a very nice diamond ornament. This is because, as demonstrated with this rectangle of paper, when one folds the ornament the edges do not meet in the middle. While it will be possible to sew this center seam the side points will curl as the edges are pulled together.

To avoid this I like to square up the basted square. To do this I cut the strip of paper at one of the marks. (Because one fabric edge is already very close to the stitched design I chose the shorter dimension.) I folded the strip of paper in half to mark the middle. Then I set the paper on the stitching with the middle fold on the centerline of the ornament and used pins to mark the ends of the strip. On this fabric the square was only out by one thread on each side, but I have seen fabric that was much more rectangular.

Then I removed the basting from the two long sides and rebasted along the threads that were marked by the pins.

Next I trimmed the fabric to a tiny bit more than 1/4 inch from the basted line. Then I was ready to sew the ornament together.

If my stitched design had an obvious top I would now make sure that fabric was laying on my table with the top of the design to the top. This is because I can then use the final seam thread to make a hanger for the top and a tail for the bottom.
I folded the bottom of the fabric up to the top so I could sew the two side edges together. Since the basting threads from the top and bottom effectively mark the corners, and because they would get in the way as I sewed this seam, I first removed the basting threads from the two sides. I like to stitch with a running stitch that goes over two threads and under two threads. (When I stitched this one together I used a knot to start, but I wish that I had left a tail to finish later because it would be less apt to pull through the fabric.) I began to stitch 4 threads above the top right corner. First I inserted my needle through the top fabric 4 threads above the corner and then I continued passing it through the bottom fabric 4 threads from the corner. Then I brought the needle up through the bottom fabric 2 threads from the corner and continued passing it through the top fabric 2 threads from the corner. Next I passed the needle down through the corner positions.

Then I tightened up the stitches and continued with an over two and under two running stitch. To get this perfect I needed to flip the fabric over for every stitch but I think that it is worth it to get the threads of the finished ornament to line up nicely. When I reached the bottom...

...I looped the thread up over the folded edge and began to stitch back towards the top. This time I only stitched up about a half an inch, to make a secure end to the seam, but I later wished that I had continued all the way to the top and knotted the thread end to the thread beginning. Alternatively I could have left a tail of the thread at the beginning and used it to stitch towards the middle for a half an inch or so.

Then I sewed the seam for the left hand side, again using an over two and under two running stitch.

Before I turned the ornament right side out, I took a minute to finger press the seams flat.

When I turned it right side out I used a large tapestry needle inside the seam to make sure that the seam was pushed out right to the corners.

Most people like to stuff their diamond ornaments with fiberfill but I prefer something that looks a little more tailored. I like to use a square of 2 mm thick fun foam (craft foam sheet) because it gives a bit of thickness, it is flexible and it doesn't crease when bent. I usually use a square that is about 1/4 inch smaller than my ornament. To figure out what size square I needed I brought the two seams together and loosely pinned them in place.

Then I measured and cut my fun foam.

To insert the fun foam I removed the pins, folded the diamond in half...

And inserted two opposite corners of the fun foam into the stitched corners of the diamond. Before moving on I made sure that the running stitch seams were still pressed flat open.

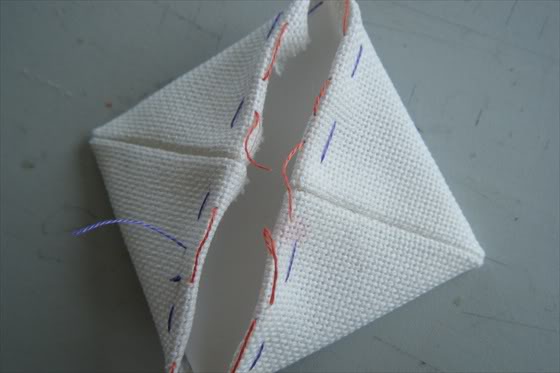
Then, using the red basting thread as my fold line, I folded the raw edges to the inside of the diamond. Using violet coloured thread I basted the fold fabric so I could more easily sew the final seam.
Next I cut a very long piece of thread so that I could sew a very loose ladder stitch seam in both directions, and also to leave long tail ends to make a hanger or a tassel for the ornament. (I wish the next photo wasn't so blurry but I hope the numbers will help.) I clipped away some of the red basting thread so I could start in the center. On the line marked by the basting thread I inserted my needle down in the fabric on the right side of the gap (1) four threads above the previous seam and brought it up again (2) two threads closer to the seam. Then I crossed to the left side and inserted my needle (3) two threads above the previous seam and brought it up (4) at the previous seam. I pulled the thread after the needle, but left half of it behind so I could later use it to sew the top part of the seam.

I continued on with an over two and under two stitch, inserting my needle at the seam on the right side and bringing it up two stitches further down. Then I crossed to the other side and inserted my needle two threads below the previous stitch and brought it up two threads further down. I continued in this manner stitching to the bottom point of the diamond, removing a bit of the basting thread each time it threatened to get in my way.

Starting at the middle of the diamond, and going one stitch at a time, I tightened up the seam. I left the long thread tail so I could later make a tail for the ornament.

Then I threaded the long tail of thread, that I had left at the center of the ornament, onto my needle and continued the over two and under two ladder stitch to the top of the ornament. I carefully tightened up the threads and left the long thread so that I could later make a hanger for the ornament.

Finally I removed the violet basting thread...

... and flipped the ornament over.

Now I just needed to add the hanger and tassel.
For the hanger Mill Hill suggests that you insert the needle and thread through 32 beads and then bring the needle down through the first 2 beads again before securing the thread. I find that the hanger is more secure if I travel through all 32 beads twice. To do this I threaded the tail of thread into the needle and poked the needle out one side edge of the ornament very close to the point. I threaded 32 beads onto the thread...

...then I poked the needle into the other edge of the ornament very close to the top and pushed it through so that it emerged where it started, on the other side of the ornament very close to the top.

When I travel through the beads the second time I like to lead with the eye end of the needle. This is so that the needle will not pierce the thread that is already in the beads and make it impossible to pull the loop nice and tight. So, I passed the needle through the first beads...

...the next beads...

...the next beads...

...and the last few beads.

Then I used the sharp end of the needle to poke through to the other side again.

I tugged on the thread to tighten the loop, made one tiny backstitch and tunneled the needle about 1/2 inch away. (Note this photo is from an ornament that was made with whip stitch seams instead of running and ladder stitched seams.)

Finally I tugged on the thread and cut it close to the surface.
Now for the tassel.
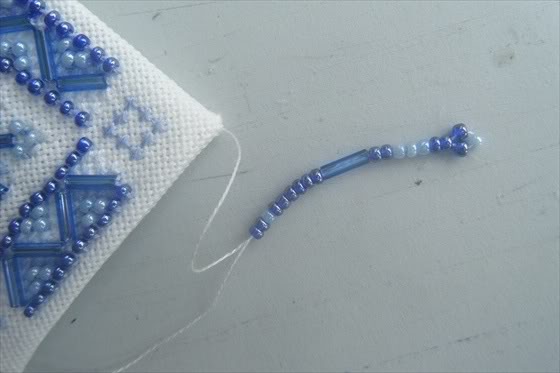
I threaded the long tail of thread onto the needle and started it, as I did the thread for the hanger, on one edge very close to the point. I added the beads as described in my Mill Hill instructions. As instructed, when I am ready to return I don't pass the needle through the last three beads. I passed the needle, eye first, through some of the beads...

... and the last of the beads.
Holding the beads between two fingers I pulled on the thread to bring the beads snug to the ornament. Then I passed the needle through the ornament to a spot on the other edge very close to the point.

I added the beads for the second tassel, pulled it up snug to the ornament, pushed the needle into the ornament so that it emerged in the front of the ornament between the two other tassels and very close to the point.

I added the beads for the third tassel, pulled it snug to the ornament and pushed the needle into the ornament so that it emerged in the back of the ornament, very close to the point.

I added the beads for the fourth tassel, pulled it snug to the ornament, and pushed the needle into the ornament so that it emerged right down at the point of the ornament in the center of the other tassels.

I added the beads for the fifth tassel, pulled it snug to the ornament, made a couple of tiny backstitches, tunneled the thread about 1/2", tugged on the thread and clipped it close to the fabric.

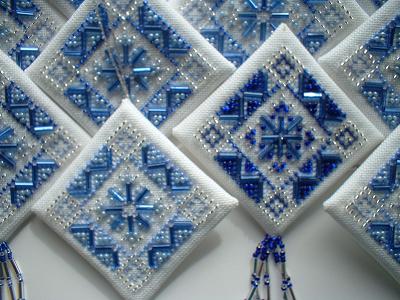
In 2004 I made about 20 ornaments using the pattern from this kit but using slightly different beads. I didn't record all of the combinations but I believe that the darker one used the beads that were suggested to me by "Lovely Lee".
The kit used DMC: metallic silver, white, 794 and 800
1. 00168 = sapphire blue seed
2. 02010 = ice seed
3. 40161 = petite crystal
4. 72010 = small blue bugle
5. 82010 = med ice bugle
6. 13032 = sapphire rondele (5)
Lee's Blue Diamond used (in the same order)= DMC: 762, white, white and 797
1. 00020 = royal blue seed
2. 02010 = ice seed
3. 40020 = petite royal blue
4. 70020 = small royal blue bugle
5. 82010 = med. ice bugle
6. 13033 = 4mm sapphire (4) and 13009 magenta margarita (1)
For most of my ornaments I used (in the same order) DMC: 762, white, white and 341
1. 02007 = satin blue seed
2. 02010 = ice seed
3. 40020 = petite royal blue
4. and generic bugle bead that is lighter than 70020
5. 82010 = med. ice bugle
The ornament used in this tutorial was similar except I didn't use and of the ice seed beads and I substituted a purply blue seed bead for the petite royal blue beads.

Pinwheel 2010


