(If you are just looking for a tutorial to make a yoyo ball ornament click here.)
This was another 6 in the morning vision. In my minds eye I could see a ball covered in double yoyos. The bottom yoyos would be black and the top yoyos would be the vibrant colours of a stain glass window.
The first disappointment came when I opened my long neglected box of quilting fabric. Who knew that there wasn't anything in there that resembled the colours of a stain glass window. I settled for some pieces I thought would look good on black. I needed 12. I only came up with 9 so I repeated the yellow print and used the flip side of two others.
Then I started to look for black fabric. I wasn't surprised that there was none in the quilting box so I went looking in the "archives" I keep in my sons' closet. Nothing there either. (Well there was his brand new black dress shirt... but he has only worn it once.) Then I had an inspiration. Dh had a brand new black t shirt in his "give away box". It would do for this experiment.
And so I was off and running. I cut twelve 3 1/2" circles from the bottom of the black t shirt. To my surprise they made very nice yoyos. Then I made twelve coloured yoyos from 2 1/2" circles. Then I went looking for black buttons. I didn't have 12 of them. I was eying my son's shirt again. (I could always buy him new buttons...) I decided that I would have to postpone this project until I could get to the fabric store. Or at least a second hand store that might have some black shirts. I went back through my buttons and picked out some navy blue and dark grey ones.
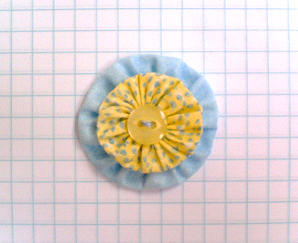
I used the buttons to join the coloured yoyos to the black yoyo. Then I arranged them in two groups of six. I chose the repeated yellow print for the center ones and moved the others until I liked what I saw. As so.

I picked up the 2 center yoyos and marked 5 spots at equal distances. (I used tiny safety pins, not shown.) Then I tacked the five outside yoyos to the center ones at these points.
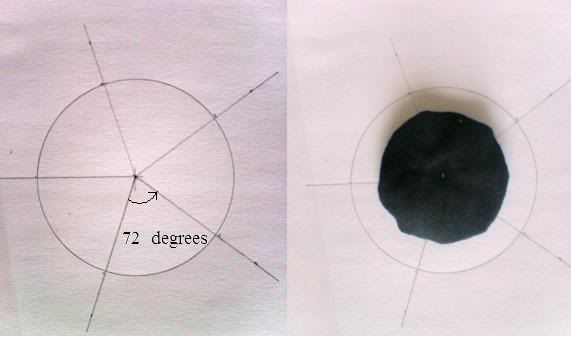
Then I was ready to add them to my 2 1/2 inch styrofoam ball. In the wee hours I had several ideas of how I would cover the styrofoam ball, to keep the white from showing in between the yoyos. I didn't use any of them. Instead I cut a one inch strip from the bottom of the t shirt and wrapped it around the ball. (Hmmm. Maybe I could use a variation of that for a temari type ball.) I noticed that it naturally curled up so I took advantage of that and wrapped it with the right side down.
A friend "greyed" this picture a little to make the strips show up more than they really do. The fabric is the same black as the black yoyos.

I had planned to sew all the yoyos together but I recognized that, sewn together, they were going to be a little too big for my ball. I needed to let them overlap a bit. So instead I used a pin to stick one center yoyo to the "North Pole" of the ball and another pin to stick the other centre yoyo to the "South Pole" of the ball. I spun the yoyos of the Southern hemisphere until I got an arrangement I liked. (With the tops of the southern hemisphere yoyos fitting in the gaps between the northern hemisphere yoyos.) Then one at a time I applied a dab of fabric glue to the center of each yoyo and stuck it to the ball. (I used fast drying Fabri- Tac.) I glued one yoyo from the top half, then an adjacent one from the bottom half. When they were all glued in place I removed the pins from the "Poles".
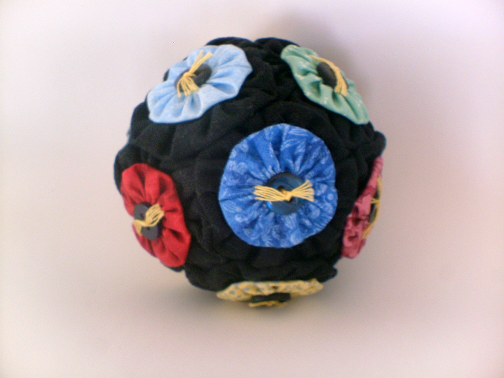
The finished ball is 3 1/2 inches in diameter.
This ball is nothing like the one that was in my minds eye at 6 am. It is a bit too much "bright polka dots on black background". I think that a double one like this would look better with monochrome yoyos on a solid background. If I were to do a multi print one again I would make single coloured yoyos (single or double layer) and let the background colour show through a little more.
It also occurs to me that if one used a sequin, or felt circle, for the center of the flower one could permanently pin each flower to the ball. (I would still tack the five yoyos to a center one so that they end up roughly equal distance apart.) One could use a round headed pin, or a pin with a bead or... I guess one could even use two (or four) decorative pins and regular buttons.
And possibly one could use a similar method to attach six yoyo flowers to a foam cube. (Hang it from one of the corners perhaps?)
One other small thing that I would do differently next time. I used freezer paper for my circle pattern. I find that this makes it very quick and easy to cut the circles. (Just iron on the pattern and cut around the circle, stopping about a 1/4 inch from the end. Remove the paper pattern. Finish the cut.) I also like that I can use the same pattern over and over again. However, yesterday it was too hot to be standing over a hot iron so I should have used the adhesive vinyl (Mactac) that I keep on hand for patterns and templates. It is just as fast and just as reusable, but I could have been sitting in a comfy chair in the shade somewhere cutting the 24 circles.
I enjoyed the project though and think I like it well enough to add a loopy ribbon tail and keep it for an ornament. Or maybe I'll tear it apart and use it for the start of a small wall quilt. They did look nice when they were lying flat together...

But first I think I'll try making another YoYo Bola. (Maybe one that looks like a less virulent virus than the original one.)

Pinwheel 2009

Thanks for sharing an intriguing idea ... I know I am going to have to play with it now that you've put it in my head.
ReplyDeleteYou are very welcome riona. Can I look forward to seeing some pictures?
ReplyDelete