
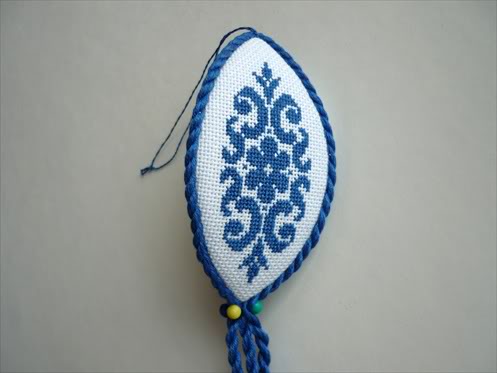
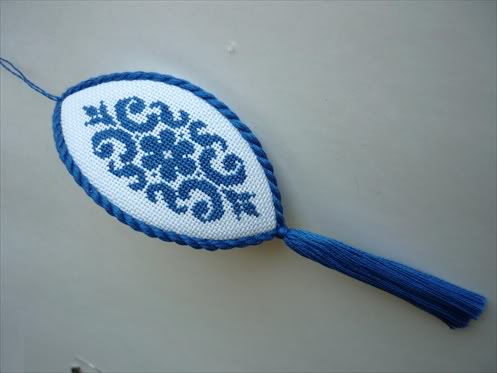
I stitched this wee ornament just so I could take some step by step assembly pictures. Once again I adapted the Pelin Tezer design (see this earlier blog entry) but this time I used Ice Blue 25 count fabric. (Thanks Barb!) When the ornament was complete I looked at the pictures I had taken and said "Why don't I have a picture of that step." As usual I will try to compensate for the missing photos by using too many words.
(P.S. In November 2010 I posted some notes for a similar three sided ornament. Those notes may illustrate some of the steps that weren't well illustrated on this tutorial.)
On to the tutorial...
Click here to view, download or print a pdf version of this tutorial.
After I had stitched the design three times I cut three leaf shapes from white card stock and marked the centers of the card stock pieces with a pin hole. (For adjustable templates for leaf shapes, also known as lens shapes, see my Lens Template page.) Then I applied some glue (glue stick or Fabric Tac are good choices for this) to the card stock pieces and laid them sticky side down on some white felt. When the glue was dry I cut the felt around the card stock shapes.

I laid one of the stitched pieces face down on my work surface. I poked a pin through the pin hole of the card stock and into the center of the stitched piece. With the points of the card stock shape lined up with the center line of the stitched piece I cut around the fabric, approx. 3/8" (or 1 cm.) from the card stock shapes. (This would have been easier if I basted the center lines on the stitched piece. See the bottom of the page.)
I used pins to mark a spot on the center line of the stitched piece that was just above the points of the card stock. (Which I wouldn't have had to do if I had marked the center line with a running stitch.)

Keeping the points of the card stock lined up with the pin marks ...

...I folded the fabric over the card stock shape at the widest point and secured it to the card stock with dots of Fabric Tac glue. (I think double sided tape would have worked well too.)

Still keeping the points of the card stock lined up with the pin marks I used a tooth pick dipped in Fabric Tac glue to gradually glue one fabric edge, from the center up towards the point. I repeated for the other edges, gently pulling the edges of the fabric towards the center to keep the fabric taut on the card stock. When I removed the pins it looked like this.

(If you don't have fast drying glue lacing the fabric edges from side to side is another good way to keep it taut.)

To keep the fabric at the points snug against the card stock I hand sewed a seam where the two sides of the fabric met. (Though I was able to push this seam allowance out of the way when I later assembled the ornament I think that next time I may press the fold down against the seam so that I won't have to wrestle with it. Or I may get braver about cutting away the excess fabric.)

Then I repeated the above steps for the other two stitched pieces.

When I sew these shapes together I like to start in the middle and use one long thread to sew all three seams. (Then I don't have to worry about a knot pulling loose or putting too much stress on the fabric.) However when there are three sections to the ornament this means that I finish up at one of the points of the ornament with no way to get back to the middle. I solve this by leaving a thread tail long enough to take me to the end. (If you get lost following the directions that follow have a look at the tutorial on this page. Though the shapes are a bit different the construction order is the same and I think I did a better job with the illustrations.)
So, starting with a thread that was about 18 inches long I sewed a short stitch at the center of one side of a leaf and another short stitch in the center of one side of the second leaf.

(I like to make the stitches near the inside of the ornament, closer to the card stock instead of the top of the felt, so that the the seam creates a furrow between the two leaves.)

I pulled the thread through but left a tail about 5 inches long. I knotted the two ends of the thread together ...

... and pulled the two stitched pieces together.

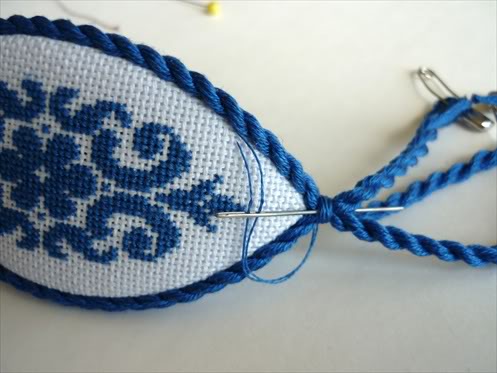
Using the short end of the thread I sewed towards one point. Again I made my stitches toward the inside in order to create a furrow. (I usually use a ladder stitch to assemble this type of ornament but I did stitch one section with a slip stitch so I could see if the cording covers that type of seam as well. It did.)

When I reached the point of the leaf I left the thread to finish later. I used the other end of the thread to sew towards the other point. When I reached the point of the leaf I passed the needle and thread under the fabric to the other side of the leaf so that it was ready to sew on the third leaf. Because the first section (leaf) was under the second I couldn't lay the third flat under it. To keep the seam nice and tight I laid the third section against the second so that their points were sided by side and sewed the first half inch or so this way.

Then I pushed on the two points of the ornament to separate the first and second sections. I curved the third between them so I could stitch the rest of that seam. At the point I tunnelled the needle under the fabric to reach the one remaining seam. (If I felt that the points were not sufficiently close together I would have tunnelled the needle under the points of the two other sections and gently pulled them together.) Then I sewed the last seam. When I reached the points I tunnelled the needle under the fabric of all three points a few times to draw the points together and to secure the thread. (This is better is better illustrated on the other three sided ornament tutorial.) Then I tunnelled the needle under one of the stitched pieces and brought it up about one inch away from the point. I pulled on it a bit and cut the thread close to the surface of the fabric so the end popped back under the fabric.
I used the same steps to finish the thread at the other end.


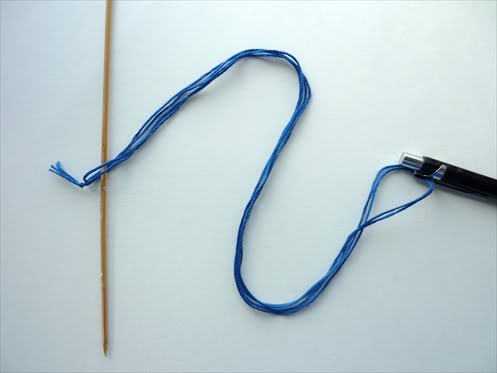
Then I was ready to make the cording. For the cording I used 4 lengths of 6 strand floss. I wanted to twist about 6 inches of cording for each seam and tassel but I added one inch for "shrinkage". I measured out 56 inches of 6 strand floss (4 lengths times seven inches times 2) and added a little more (for the knot) before I cut it. I knotted the ends together, made the loop into a figure eight and folded it in half.

I inserted a bamboo skewer (a knitting needle works well too) through the loop near the knot and clipped a pen at the other end of the loop. (I sometimes use an electric mixer to make cording but it wasn't worth the trip to the kitchen for just three short pieces.)
I put the two ends of the skewer under my two feet, held the pen upside down, pulled the threads tight and began to twist. After I had twisted the pen about 50 times the thread wanted to double up when I eased the pen toward the skewer. I pulled the pen up again and gave it 10 more twists for good measure. Carefully holding the center of the twisted thread with one hand I brought the clip of the pen down to the skewer. Only then did I allow the thread to twist on itself. With a bit of tugging and twisting it looked soon like this:
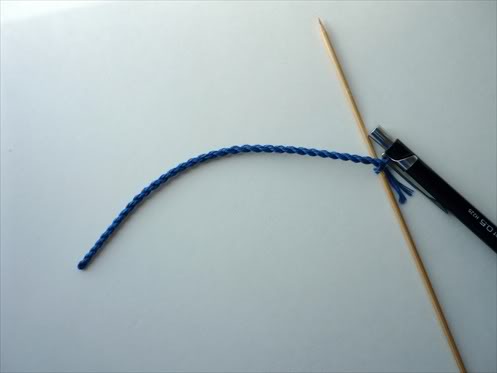
To keep the cording from untwisting too much I replaced the skewer and pen clip with a safety pin. (A paper clip works well too.) I repeated this procedure to make two more pieces of twisted cord.

Next I twisted a single strand of floss to make a corded thread for the ornament hanger. (I tied one end to the skewer but I just used my fingers to twist the thread.)

I threaded the hanger thread through a tapestry needle and threaded the tapestry needle through the loops at the folded ends of the three pieces of twisted cord.

I adjusted the hanger thread so that it was centered on the loops and made a knot to draw them together.

To keep the hanging thread more to the center of the ornament I threaded the two ends into the tapestry needle and threaded the needle up between the three looped ends. I removed the needle and tied the two ends of the hanger thread together.

Then I was ready to attach the cording to the ornament. I stuck a pin down the hole where I had just threaded the hanger thread and pushed the pin into one end of the ornament.

Moving the three pieces of cording out of the way I used a toothpick to apply a small amount of white glue to about the top inch of one furrow between two of the ornament sections.

I gave one piece of cording a little twist to tighten it up, pressed it into the glue and stuck a pin through the cording and into the furrow little below where the glue ended. Any excess glue that showed around the cording was removed with with a clean toothpick. I repeated this procedure for the other two pieces of twisted cord and left it to dry.

When I returned I removed the pins then used a toothpick, white glue, and pins to attach about another inch of cording to the three furrows. (I didn't forget to give the cording a little twist before I pressed it into the glue.) Again I removed any excess glue and left it to dry.

When I returned I again removed the pins and used a toothpick, white glue, an extra twist and pins to attach the twisted cords to the furrows right down to the bottom point of the ornament. I checked for excess glue and left it to dry.
Finally I was ready to make the tassel. I took a 20 inches of a single strand of floss, folded it in half and passed the ends through the loop to make a circle.

I removed the pins, threaded the ends of the three cords through the circle of thread and lifted the circle up snug against the bottom of the ornament. I pulled the circle tight, making sure that it was well centered on the bottom of the ornament and that all the cords were flat against the ornament.

Next I wrapped the two ends of the thread around and around the three cords until I had about four inches of thread left. I threaded the ends of the threads into a tapestry needle, inserted the end of the needle above the wraps and pushed it towards the center of the three cords.
I cut the loops at the safety pins...

...cut off the knots and gently untwisted the threads.

I used a clean moist face cloth to dampen the threads and then straightened them with a wide tooth comb. When they were straight and smooth I used a ruler and rotary cutter to cut the ends off straight and even.
(Though, as usual, the angle of the photo makes them look anything but!)
Click here to view, download or print a pdf version of this tutorial.
As I mentioned above it would have been easier to keep this ornament centered while cutting and folding if I had marked the center lines of stitched piece and the cardstock.


Pinwheel 2010

Pinwheel 2010

I love this tutorial! It is so easy to follow and understand. I haven't made one yet, but I sure will be later this year!
ReplyDeleteOh, and thanks for stating that you use a toothpick to apply the glue. Now I know how to apply glue with little mess, lol.
Thanks for your kind words Jules.
ReplyDeleteBelieve me when I squirt glue directly from a bottle there are no "little" messes!
This is such a detailed tute. I love it. You really explained all the things that most people gloss over. Thanks so much!
ReplyDeleteYou are very welcome Annie. In the past I have wrestled over what to include and what to leave out. Lately I've been including more. I just wish that I had taken the photos needed for some of the details. I'm fighting the urge to stitch, assemble and photograph another three sided ornament just so I can add those photos. Maybe some day. Right now other projects beckon.
ReplyDeleteDoreen.....you do an excellent job on stitching AND your tutorials are wonderful!!!!! I am still and always will be amazed at your craftmanship...thank you so much!
ReplyDelete~Peggy~
psm8
You are very welcome Peggy. Thank you for your kind words and encouragement.
ReplyDeleteExcellent tutorial, you make it look so easy! Your stitching is gorgeous too.
ReplyDeleteThank you.
You are very welcome. Your encouraging words have brightened up a grey sky day.
ReplyDeleteWonderful tutorial. You addressed things that most tutorials do not discuss, such as how to incorporate the tassel into the cording. How clever! - Christina G
ReplyDeleteThanks Chris. It was a real eureka moment the morning I figured out I could use cording on this type of ornament and not worry about tucking in or trying to hide the ends at the top of the ornament.
ReplyDeleteThats great, I've been searching for so long that kind of post. Thank you so so so much. Now I'm a great fan of your blog. Thanks again for shearing you work.
ReplyDelete