This page is the third blog page about flat ornaments. To view the first page click here.
To make flat ornaments with a bound edge one can use a satin stitch or a blanket stitch.
Blanket Stitch Gift Tag
For the blanket stitch (or buttonhole stitch) finish I started with two pieces of fabric, the stitched piece and the backing piece. The pieces should be bigger than the desired size of the finished ornament. (I cut mine a little smaller than I should have but it wasn't a problem until the very end.)

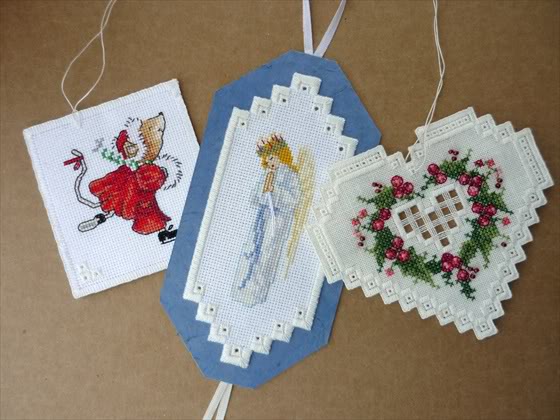
(Seraphina goes Skating adapted from DMC Seraphina Occasions. Stitched on 22 count hardanger.)
I temporarily basted the two pieces together, making sure that the needle went into the very center of the holes, that the thread followed the grain of the fabric and covered the same number of threads on the front as on the back.

Then using DMC Perle #12 I began to blanket stitch the two pieces of fabric together. As with the running stitch finishes I needed to flip it over every stitch and check that the needle was poking through the second layer of fabric in the correct hole. This was a very slow process...

... but eventually I had gone all the way around the square.

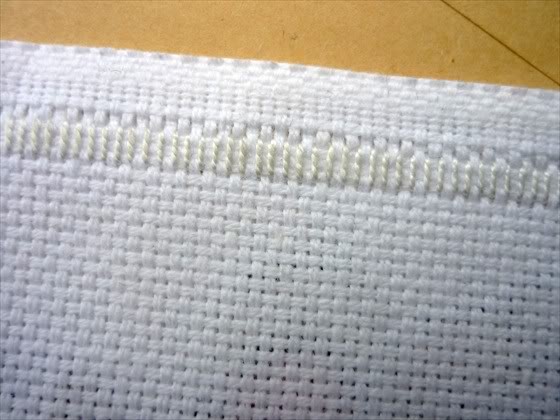
At this point I could have chosen to just trim and fray the edges but for this tutorial I chose to cut away the two layers of fabric. To make it easier to cut close to the blanket stitches I like to remove the threads just outside the blanket stitches. I don't think that this can be done with aida fabric but for small projects on even weave fabrics one can just insert a needle under the center of the thread and pull it out. For this 22 count fabric I had to cut the threads about every inch or so and ease the segments out with a needle...

...until I had removed the whole line of threads.
I repeated this for all four sides of both pieces of fabric. Then I was ready to cut away the excess fabric. (This was when I wished that I had cut my fabric larger because I had so little to hold on to.) I cut the backing fabric first. To do so I slid the scissors between the two layers of fabric, poked the point of the scissors to the surface (not shown on photograph) and slid the scissors sideways towards the buttonhole stitches. Then I cut away the excess fabric.

When it came time to cut away the front fabric I kept the back side of the tag face up. Again I brought the point of the scissors to the surface and slid the scissors sideways toward the buttonhole stitches before I cut away the excess.

When all of the excess was cut away the tag looked like this.

Once I added the hanging thread the tag was complete.

It is very time consuming to blanket stitch though two layer of fabric. Sometimes I choose to just stitch through one layer then sew or adhere the stitched piece to wide ribbon or mat board instead. For this angel I used a satin stitch through one layer of fabric, cut it out and adhered it to a sandwich of mulberry paper and card stock. I only used a small amount of glue on the back of the satin stitches.

(From Sam Hawkins' "520 Christmas Cross Stitch Designs". Stitched on 22 count hardanger.)
But sometimes blanket stitching through the two layers of fabric does seem to be worth the extra time and effort. Here are some notes on how I stitched Emie Bishop's "Christmas In My Heart 2000" as a reversible ornament. (I wish that I had taken more photos of the process.) I stitched it on 36 count linen using single strands of floss and DMC Perle #12.
First I stitched the front of the design, except I only did the cross stitching, the eyelets and the satin stitches inside the eyelets.
Then I stitched a piece for the back that only had the eyelets and the satin stitches inside the eyelets.
Then I basted the two pieces together. Because I wanted the the two layers to exactly match up when I stitched them together I basted a line up the center, through the eyelets and then I basted around the outside of the heart. I knew that the blanket stitches were going to cover four threads beyond the eyelets so I placed each basting stitch five threads (vertically and horizontally) from the outside corner of each eyelet.

When the basting was complete it looked like the two photos below.


Then I stitched the blanket stitch through both layers of fabric.

Finally I stitched the satin stitches for the inside of the heart. I didn't have any thread fine enough to do a nice job on the woven bars and dove's eye (on 36 count fabric) so I decided that I would instead create a sort of pulled thread heart. For the inside heart I cut all of the the threads from the back layer of fabric. ie. I removed the whole heart. Then I cut the alternating pattern of four threads from the front fabric. (Cut four and leave four.)

To cut out the outside heart I used the same sequence I used for the ornament at the top of this page. (First I cut all the fabric away from the back layer and then I cut all the fabric away from the front layer. To give my scissors more room to work I removed the thread that was closest to each line of blanket stitches. And for both layers I like to have the back side of the ornament facing up when I cut.)

Click here to view, print or download a pdf of these notes about making this reversible hardanger heart.

Pinwheel 2010

Gorgeous :)
ReplyDeleteThanks for the compliment Patty!
ReplyDeleteAwesome tutorial. It really helps a lot.
ReplyDeleteThank you for your kind words.
ReplyDeleteBeautiful! The last ornament looks a little like filet crochet, with that lacy texture around the edges and middle.
ReplyDeleteI've never thought about it before it before but there probably are hardanger designs inspired by filet crochet, and vice versa.
ReplyDeleteI went to download the Heart and the file was unavailable. I am attempting to make my first Hardanger and I think this would be perfect. Thank you!
ReplyDeletemab3500 if you can email me at glfpesqx@objectmail.com I'll send you the notes on how I stitched Emie Bishop's "Christmas In My Heart 2000" as a reversible ornament. (You could copy and paste, to an email or word processing document) that part of this blog page but it uses a lot more paper than the pdf version.)
ReplyDeleteLovely ideas
ReplyDeleteI stitch on pre made bookmarks. Is there something I can do to cover up the back?
Thanks, B mullinmb@hotmail.ca
I know some people use felt but I would think that would be a bit thick between the pages of a book. If you could find ribbon that was either the exact same width or just a little bit wider then you could add it to the back without making the bookmark much thicker. You could use needle and thread, fusible web or a very light application of fabric glue to attach it.
ReplyDeleteWhat great ideas. I love to make ornaments for my friends and family and they look great till I go to finish them off. I love these suggestions and will be using them this year!!!
ReplyDeleteprecioso te sigo, te invito a que pases por mi blog y si te gusta te quedes.
ReplyDelete