
Flat finishes are ideal for bookmarks and gift tags but they make very nice ornaments as well. The basic idea is to finish the back of the project with the same fabric as on the front of the ornament and to sew the two layers together. One thing I really like about this finish is that usually everything I need, ie. fabric, needle, thread and scissors, is already in my project box. I can finish stitching the design and start finishing the project immediately. For this reason they make handy portable projects.

There are a variety of stitches that can be used for this but a running stitch, double running stitch, satin stitch or blanket stitch are the simplest. (Diagonal stitches and cross stitches are possible but they take a bit of planning to get them to work out with too much fudging in the corners.)
Though I call these finishes flat finishes when one is making an ornament one can choose to add something to the middle to give it a bit of thickness. One could also add some non woven interfacing to the middle for extra stiffness and to make the back of the stitching less visible through back of the project.
On this page I will describe how I made the ornament and bookmark shown below.

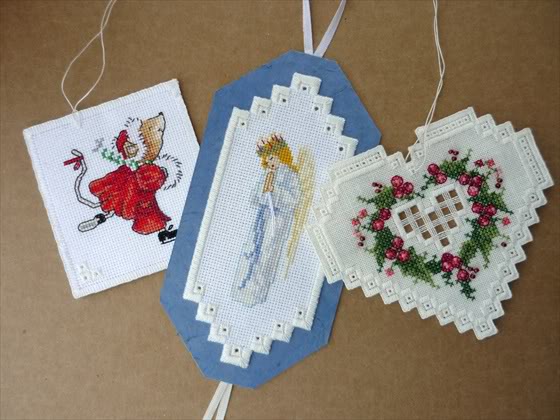
To see how I made the two banner ornaments below click on the photo.

(This variation is on that page as well.)

To see how I made the three bound ornaments below click on the photo.
Running Stitch Ornament

(Lion and Lamb from "Donna Kooler's 555 Christmas Cross-Stitch Designs stitched on 22 count hardanger.)
First I figured out where I wanted my running stitches. Often this is just a matter of figuring out that I want to be so many "threads" (or sets of threads for hardanger or aida fabric) away from the outside edge of the stitching (2 or 3 or ...) but this time I wanted to make a rectangular design into a square ornament so I used a long basting stitches to mark a square. Then I decided how much fabric I wanted to show outside the running stitch. I chose 13 "threads" and cut away the excess fabric.
To give the ornament a little thickness I cut a square of 2 mm thick fun foam (craft foam sheet) approx. 1/4" smaller than the square I was about to stitch on the ornament. (One can use felt or card stock but I like to use fun foam because it adds a little soft thickness and helps the ornament keep its shape but it can't be creased.) Then I cut a piece of fabric for the back. Usually I cut it the exact size as the front piece but for this tutorial I cut it a little larger so it would be visible in the pictures. (Note, it is a good idea to get in the habit of making sure that both pieces of fabric are cut in the same direction from your larger piece of fabric as sometimes the fabric can have slightly more or less threads per inch horizontally then vertically.)

Next I stacked the two pieces of fabric and basted a temporary line of stitching through both layers of fabric. For each stitch I was careful to poke through the "same" hole in both pieces of fabric. By this I mean that for the front and the back I poked the needle in the center of the hole and I made sure that each stitch followed the thread of the fabric and was the same number of stitches long. Flipping the fabric from front to back is tedious but necessary.
Then I was ready to stitch the two pieces of fabric together. I usually start at a corner but this time I started in the middle and left a tail of thread so that I would be able to make a bow with the ends. In the row below my basting stitch I went down through the top fabric and made sure that it hit the corresponding hole in the backing fabric. I brought my thread up two "threads" to the right making sure that I hit the corresponding hole in my top fabric. I continued on in this matter...

...until I had just one full edge left to sew. I slid the fun foam between the two pieces of fabric...

... and continued on until I was back at the beginning. (If I had been making more of a puffy pillow I would have left a smaller gap and poked in the fibrefill before I finished the seam.)

After I trimmed the back fabric to match the front fabric I removed (frayed) two sets of threads from all edges of the two pieces of fabric, tied my red thread into a bow and added a hanger thread. Then I used a toothpick to put a spot of glue on the knot of the bow.
Double Running Stitch Bookmark

(Bookmark adapted from Victorian Cross Stitch Border
http://www.cross-stitch.co/flowers/victorian-cross-stitch.html
Stitched on 22 count hardanger.)
Unlike the Lion and Lamb project this bookmark also has a design stitched on the back so I had to be a little fussier about getting the two pieces of fabric lined up. (Note I stitched this bookmark in a mat (frame) made from a greeting card. I left it in the mat while I stitched the two pieces together. See this blog page about stitching in a mat.)

I knew that I wanted to have the lines of double running stitch four sets of threads outside of my green border so I temporarily basted the two pieces together two stitches outside the blue border. As with the Lion and Lamb ornament I was careful that each stitch was centered on the hole and corresponded with the same spot of both pieces of fabric.
Front

Back

This time I basted all the way around the bookmark.
Front

Back

I began to stitch the ornament together at one corner. For each stitch I flipped the bookmark over and made sure that the needle was poking though the correct hole of both pieces of fabric.
Front

Back

When I reached the starting point ...

...I reversed direction so that I filled in the blanks left by the previous running stitch. (Double running stitch.)


When I had completed the stitching I removed the fabric from the frame. I counted out 6 sets of threads from the double running stitch and cut along that thread for all edges of both pieces of fabric.

Then I frayed two sets of threads from each edge of both pieces of fabric.


Click here to continue to the page on banner ornaments.
Click here to continue to that page about bound ornaments.

Pinwheel 2010

Very cool! Thanks for the tutorials.
ReplyDeleteYou are very welcome!
ReplyDeletewhere did u get the purple flower pattern can u please tell me
ReplyDeletetank you
The purple flower pattern was on the page,
ReplyDeletehttp://free-cross-stitch-patterns.net/victorian-cross-stitch.html
but I can't get it to load today.
Thank you for all the ideas, now I have options!
ReplyDeleteLove the little mouse skater, any idea where you found that pattern?
The chart I used was from a small kit in a British magazine but it is also one of the designs in the DMC book Seraphina Occasions. http://www.amazon.co.uk/Seraphina-Occasions-Cross-stitch-chart/dp/B003OIF21W
ReplyDeleteI couldn't get the links to the Banner Ornament finishing, so I'd really appreciate it if you could send me the information or a link that does work, please.
ReplyDeleteHugs
Christine
I'm very late to seeing your comment. I had some issues with the blog photos in November and December but I just checked and that link should be working now.
DeleteStitchmax, An Enhanced multi frame motifs stitch Software That Comes with High Productivity and All Advanced Feature of Machine Embroidery Designing. It Has Very Unique And Exclusive Features For Stitch Effects, Drawing Methods, Automated Punching And Decorative Tools Which Are Specially Customized For Professional Designers, Industry Owners, Training Institutes, Embroidery Shops, And Apparel Designers.
ReplyDelete